How to Log In
Logging In
Mail on the Welcome Page
Volunteer managers log in by going to the Home page of the Volgistics website (www.volgistics.com) with any popular web browser. To log in, you'll need your:
- Nine digit Volgistics account number
- Email address
- Password
If you just created a trial account for the organization where you are in charge of volunteers, use the nine digit Volgistics account number you received when you signed-up, along with the email address and password you entered on the sign-up form. If you're not the person who signed-up for your account, you'll receive the account number, and your login name and password from the Administrator of the account who created your System Operator record. Carefully safeguard your Volgistics account number, login name, and password to protect your account from unauthorized access.
Depending on your account's security settings, you may need a single-use two-factor authentication (2FA) code in addition to the above credentials. If your account utilizes this additional security measure, you can find more information about that process in the Two-Factor Authentication section below.
Volunteer Log In
This help topic explains how Volgistics account holders log in to the system. Account holders are generally the people at the organization who manage or direct the volunteer department. If you are a volunteer, or someone at the organization such as the head of a department where volunteers serve, you will not login as shown in this help topic. Instead, you will use the VicNet portal to access the system. See Logging into VicNet for more information.
Here's how account holders who manage volunteers for their organizations can log in:
- Visit www.volgistics.com.
-
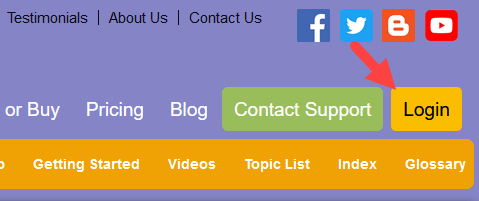
Select Login from the menu at the top of the page.
-
Enter your account number, email address, and password in the Secure Login box. The email address field is not case sensitive, but the password field is.
-
Click the Login button.
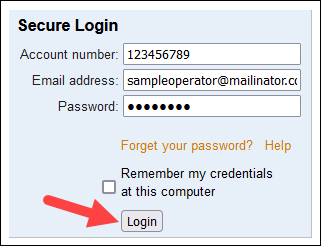
If your account is not set up to use the two-factor authentication feature, this is all you will need to do to log in. Otherwise, you'll need to take some additional steps to enter a single-use verification code as well. You can find additional steps in the Two-Factor Authentication section below.
Forget your password?
If you have forgotten your Volgistics password, or you get a message telling you that you have entered an invalid account number, login name, or password, click the Forget your password? link on the Login page. As long as the account number and email address entered match a record in the system, Volgistics will send a password reset message to the email address you use so you can create a new password. Password Reset has instructions that explain more about the password reset process.
Remember my credentials at this computer
The Secure Login box may include a Remember my credentials at this computer checkbox.
If you check this option when you log in, the computer you are currently using will remember your Volgistics account number and login name so the next time you log in the account number and login name will already be entered for you. You'll just need to enter your password and then click the Login button.
In order for your computer to remember your Volgistics account number and login name, your web browser must allow cookies. If cookies are disabled in your web browser, or by your IT department, checking this option will not have any effect.
Two-Factor Authentication
As an additional security measure to protect your Volgistics account, your Administrator may have enabled the two-factor authentication feature. With this feature enabled, you'll still enter your usual credentials (account number, email address, and password), but as an added step you'll also need to enter a single-use verification code. In this case, you'll see additional prompts after the steps you took above to receive and enter that code.
There are a variety of ways to set up the two-factor authentication feature, so the prompts you see can take a few different forms.
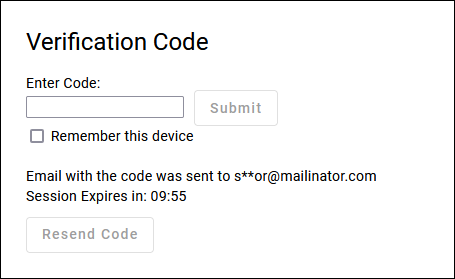
- You may see a prompt letting you know that a single-use verification code has been sent to your email. This is the default prompt all System Operators will see when two-factor authentication is enabled for your account.
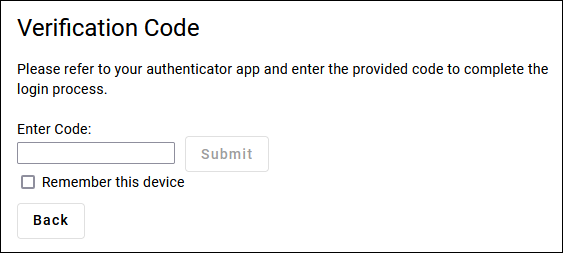
- You may see a prompt letting you know that you will need to retrieve your single-use verification code from the authenticator app you set up for your System Operator record.
- You may see a prompt asking whether you'd like to have a single-use verification code sent to you by email or to use the authenticator app you set up for your System Operator record.
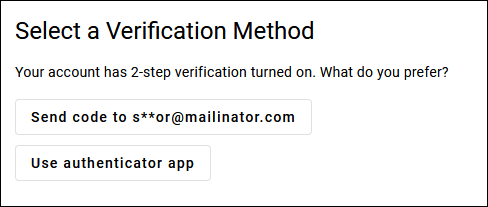
Which prompt you see depends on how the two-factor authentication feature is configured in your account. You can learn more about setting up that feature in the Getting Started With Two-Factor Authentication help topic.
To complete the log in process, reference your email or your authenticator app to retrieve your single-use code, enter it into the field, and click Submit.
If your account Administrator allows, you may see a Remember this device option which you can check to have your browser remember that you completed this authentication process for future logins. That way you don't have to complete the two-factor authentication process every time you log in. However, for security, you should only check this box on your own devices. You should never check this box on publicly accessible devices.
Set Up Authenticator App
Authenticator apps are a popular and secure way to generate verification codes for two-factor authentication. Rather than having the system send you a code by email, you can set up an app to generate new codes on a fairly rapid interval. This is generally considered the more secure option as it can only be accessed from the specific device you choose to set it up on. That way, the only way someone could get this crucial piece of information is by having access to that specific device.
If your organization requires you to use an authenticator app or you'd like to utilize a more secure option, it is a fairly straightforward process to configure.
The first step is to download an authenticator app on your smartphone or other preferred device. There are a variety of authenticator apps available for both iOS and Android devices such as Google Authenticator and 1Password. You may want to reach out to your organization's IT department if you're not sure which app you should use.
Once you have your authenticator app, you can follow these steps to set it up:
- Log in to Volgistics using the steps at the beginning of this help topic and enter your two-factor authentication code. If you haven't already set up an authenticator app, you will get your authentication code by email.
- On the Welcome page in your account, click Show QR code for Authentication App.
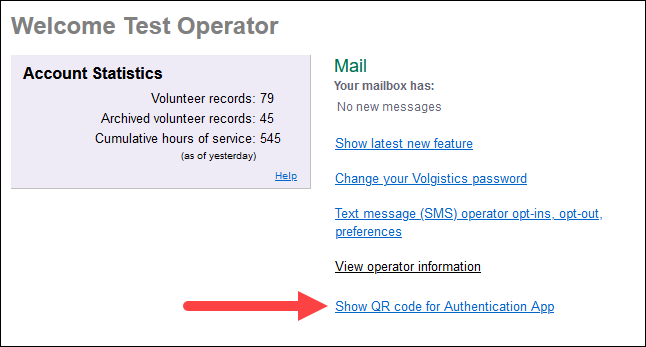
- Click Generate New Code.
- Enter your password and click Validate Password. Once you validate your password, you'll see a Secret code and a QR code appear on the page.
- Open the authenticator app you downloaded on your smartphone or preferred device. Using the options within the app, choose to scan the QR code with the device's camera or manually enter the Secret code.
- Once you've successfully scanned the QR code or entered the Secret code, the authenticator app will generate verification codes for you. To finalize the process, enter the code generated by the app into the Validate Code field and click Submit.
Now your authenticator app is set up to generate codes for you to use to log in to Volgistics.
Sessions
Once you log in, you establish what is called a session with the Volgistics system. As long as you are actively working in Volgistics, your session will stay open. You can work in the system as long as you want without having to log in again.
Volgistics includes an important security feature that closes a session if your connection to Volgistics is idle for more than about 60 minutes. This means that if you log in, and then leave your computer (or stop working in Volgistics) for more than about 60 minutes, your current session with Volgistics will automatically close. If this happens you'll see a Session Expired message when you return to the system. If you see this message, simply log in again and a new session will open.
This security feature protects you by reducing the possibility you might leave the system open at a computer that is accessible to someone who is not authorized to access your information.
Hint
If you want to access Volgistics from home or other locations, you'll need your nine digit Volgistics account number, as well as your login name and password. Unless you memorize your account number, you may want to record it on a card in your wallet or purse, or store it as a note on your cell phone. This way you'll have it if you want to log in from a different location. Just be sure to keep your account number private.
To protect your account in the event that your wallet or purse is lost or stolen, we recommend that passwords always be memorized. At the very least, do not store your account number, email address and password in the same place. This prevents potential unauthorized users from discovering all three pieces of information at once.
Related Help
- Session in Use
- Session Expired
- Password Reset
- Navigation With Web Browser's Back Button
- Create Log In Shortcut
- Change Login Name and Password
- Getting Started With Two-Factor Authentication
- Webpage or Session Expired Error Messages