International Addresses
If your organization has volunteers who reside in more than one country, you can configure Volgistics for tracking international mailing addresses.
By default Volgistics will track U.S. and Canadian addresses. If you would like to track addresses outside the U.S. and Canada, some Setup changes are needed. These are described in this help topic.
While these steps focus on the volunteer's contact information, these fields can be tracked on all of these tabs:
- Core
- Contact
- Site
- Place
- Assignment
- Coordinator
The same options are available in each of these locations, and it's usually best to make sure similar fields in different locations have similar settings.
Using the Country Field
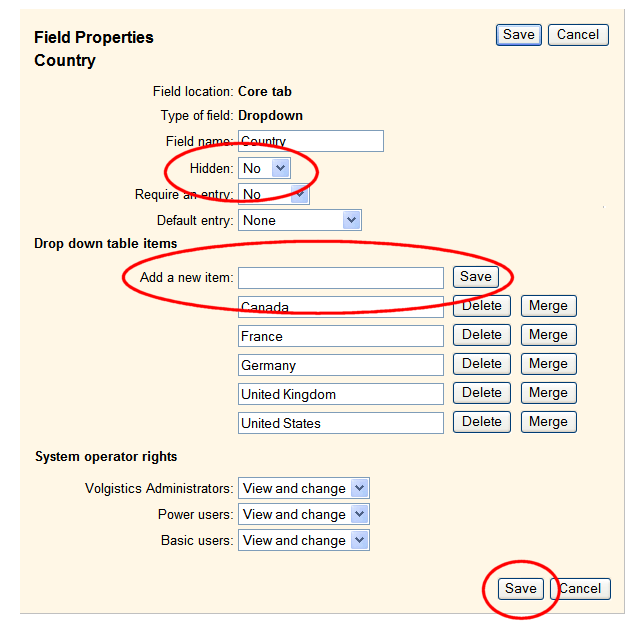
Volgistics includes a field for tracking 'country' as part of mailing addresses. The Country field is hidden by default. To un-hide the Country field:
- Choose Setup from the menu.
- Expand Field Options.
- Click the name of the tab where you'd like to make the change (e.g. Core Tab).
- Select Country.
-
Set Hidden to No.

-
The Country field uses a drop-down list, which is empty by default. You can add the country names you want to appear in the Country drop down by entering them in the Add a new item field and then clicking Save
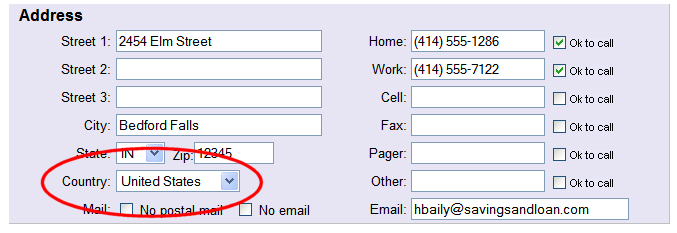
When it is not hidden, the Country field appears in the Address box on the Core tab for each volunteer.

If you use the Country field, it is not necessary for you to enter a country for every volunteer. If most volunteers live in your home country, you can omit the country entry for these volunteers. If you enter a country as part of a volunteer's address, it appears as part of the address on labels and lists. If you do not enter a country as part of the address, the Country field will not be used when the address is used.
Using the Country Field in Online Volunteer Application Forms
If you have un-hidden the Country field for volunteer addresses, then you can also add it to any of your online volunteer application forms. To add the Country field to an application form:
- Choose Setup from the menu.
- Expand Application Forms.
- Select the form where you'd like to add the field or click Create a Form to start a new form. You can also clone a current application to start a new form.
- Click Customize Form Content.
- Expand Core Fields and drag the field to the form section you'd like. If you need more information, see Customize Application Form Content.
- Click the Save button.
Expanding the State/Province Field
If you track international addresses, the field typically used for the state or province in the U.S. and Canada may need to include entries for more than (or instead of) states and provinces, depending on the addressing standards for the nations for which you track addresses. To add additional (or different) values to the State field:
- Choose Setup from the menu.
- Expand Field Options.
- Click the name of the tab where you'd like to make the change (e.g. Core Tab).
- Select State.
- Use the Add a new item field to add each of the additional entries you want to appear in the State drop down list.
- Click the Save button.
Expanding the Zip/Post Code Field
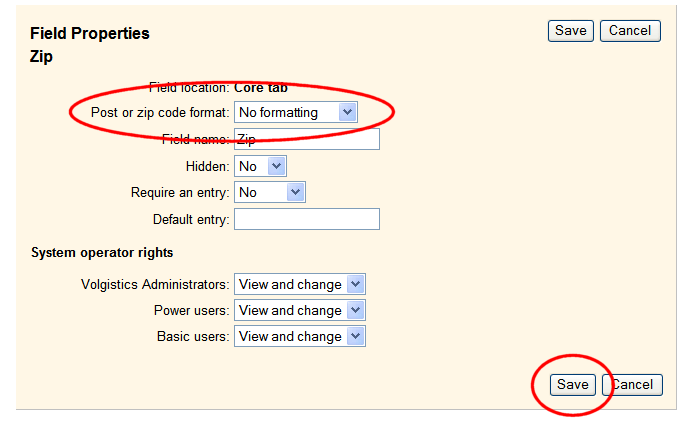
By default, the Zip/Post code field accepts only postal codes that are properly formatted for U.S. or Canadian addresses. If you need to track postal codes with formatting other than these, you should remove the default U.S. and Canadian post code formatting requirement for this field.
- Choose Setup from the menu.
- Expand Field Options.
- Click the name of the tab where you'd like to make the change (e.g. Core Tab).
- Select the Zip field.
-
In the Post or zip code format field, select No formatting.

-
Click the Save button.
Updating Phone Fields
Phone number fields, by default, use US/Canadian formatting with optional area codes. You can adjust the required formatting for phone numbers like this:
- Choose Setup from the menu.
- Expand Field Options.
- Click the name of the tab where you'd like to make the change (e.g. Core Tab).
- Select the the phone number field you'd like to edit.
- Choose the Phone number format you want to use for this field.
- Click the Save button to save your changes.
Now phone numbers in this field will follow the formatting you selected when they're saved. Phone numbers already entered into this field won't be updated right away, but will be the next time that page is saved.